🚽 Upgrade your throne with ease and efficiency!
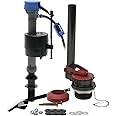
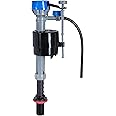
The Fluidmaster 400ARHRKP10 PerforMAX Repair Kit is a universal, all-in-one solution designed to replace inefficient toilet components. Featuring a 2X faster refill valve adjustable from 10 to 15 inches, a high-performance water-saving flapper, and an easy installation process under 10 minutes, this WaterSense certified kit ensures superior flush performance and water efficiency for 2-inch flush valve toilets.


| Material | Plastic |
| Brand | Fluidmaster |
| Item dimensions L x W x H | 4.52 x 7.67 x 13.77 inches |
| Exterior Finish | Plastic |
| Inlet Connection Size | 2 Inches |
| Inlet Connection Type | Barb |
| Outlet Connection Type | Barb |
| Number of Ports | 2 |
| Outlet Connection Size | 2 Inches |
| Specification Met | WaterSense |
| Valve Type | fill_valve, flush_valve |
| Global Trade Identification Number | 00039961014771 |
| Manufacturer | Fluidmaster |
| UPC | 039961014771 |
| Part Number | 400ARHRKP10 |
| Item Weight | 10.6 ounces |
| Product Dimensions | 4.52 x 7.67 x 13.77 inches |
| Item model number | 400ARHRKP10 |
| Is Discontinued By Manufacturer | No |
| Size | 1 Pack |
| Color | Easy Install |
| Style | Repair Kit |
| Item Package Quantity | 1 |
| Number of Handles | 1 |
| Special Features | Adjustable |
| Included Components | All-In-One Toilet Repair Kit |
| Batteries Included? | No |
| Batteries Required? | No |
W**N
Super easy install
So I'm definitely not a plumber, I like to consider myself basically handy, and I've worked on toilets before a little bit, but I can tell you if you're reading this and you have never even lifted the lid off the back of your toilet tank, and you think you need to because something's going on like it's not shutting off or something, seriously don't be afraid just watch a couple of YouTube videos and then buy this product. Honestly I don't care what product the YouTube video is asking you to buy because that video might be sponsored by a specific company that wants to sell their product, don't listen to them, buy this one. This has everything in it that you're going to need for pretty much I'd say 95% of the toilets that you could possibly have sitting in front of you they need to be fixed. The idea behind this is that you can fix the problem that you have and you will have spare parts left over. This eliminates the possibility of you buying the wrong kit and not having the right part and having to go buy another kit because you've already opened the first one you can't return it.... Yeah let's avoid that.But anyway watch a quick video or two, read the directions it came with this and I replaced everything inside my toilet tank without very much confusion because even though I had never done it the directions that come with this with the video I watched explained everything. How to adjust it so that the water level and the bowl is where you want it, which parts to use for which toilet you've got, plus if you're ever in doubt just look at what you're removing and grab the same pieces out of this package and put them back in there. Basically if you're a first time or don't be afraid to give it a shot because honestly if you were going to call a plumber, and pay what he was going to charge you, you could still do that after you tried this and failed... Which you wont.
R**D
I hate plumbing, but . . .
I am breaking one of my review rules, specifically, #13; and that is NEVER-EVER give a plumbing related purchase a 5 star rating. Then I got the 400ARHRK (ark?) toilet kit. After I finished the job, I realized for the first time in 3 score years, I did not say a discouraging word during the whole disassembly or assembly. Hence, the 5 stars.The instructions were spot-on. I bought two kits just in case it was short parts. It was not -- I even had two extra rubber washers -- fine according to instructions. And also two kits because I have another toilet of equal age that's probably going to demand attention in a few months.First, take a picture of the inside of the tank with your cell phone. This will help you position your parts according to your tank. Also, save the handle and activator with chain. That way you can compare the length of the new actuating lever arm and chain.2. I followed the instructions (another first), and I kept all my old parts in a clean plastic trash can just in case.Tools: Arc-joint pliers, monkey wrench, and optional, 3/8" ratchet with 1/2" deep socket (for nuts that hold tank to toilet). If you use any of these, make sure to be gentile, and as the instructions keep saying, do not over tighten anything!This is also the first time I ever removed the tank from the bowl. It made everything much easier. The only issue I had in disassembly was getting the plastic install flush valve locknut loose (see page 7 of instructions). To get that off, I took a 1/2'' wood chisel and a tack hammer to it. It quickly split. It appeared the original person had used some kind of sticky substance to ensure seal. This kit does not need any sticky stuff, the rubber washers seal everything.So, just follow the instructions.3. Steps 10 and 11 are fine tuning. Okay, let's think about this, you're using a monkey wrench that has about 3/16" of play. Fine tuning? You do want to ensure the water level is correct (pg 14) and that adjustment is using the black tank water level adjustment screw. I just used my fingers for it. It easily adjusted the level of water to the suggested mark on the inside of my tank.After several test flushes, I decided I did not need to do steps 11 or 12 and fine tuning the flush (1.6 gallon tank). It was working fine. But the instructions are there if you need them. Also on page 15 it speaks of removing "cardboard" from under the flapper. My flapper did not have any cardboard to remove. No worries.4. In conclusion: Normally, I would just as soon go to a dentist who was out of novocaine, than do plumbing. I took my time and cleaned the tank with a towel. It took me about an hour and a half, but most of that was spent just getting up and down and up and down, and running out to the garage for tools.You can do this!
E**.
All in one.
This kit comes with everything you need to change out the internals of your toilet. The listing provides a detailed instructional video that makes installation a snap even for a novice. The only thing I did not like about this kit is the handle and flushing arm. They are made of plastic and flex a bit much when flushing. I would not expect these pieces to hold up over time.
K**Y
Buen producto por el precio.
Muy buen producto, excelente relación calidad precio, compré uno y me llegó faltándole una pieza y lo devolví, al parecer alguien lo compró para quedarse con el tapón de cierre q es l parte más importante y en el control de calidad para volver a ponerlo en venta no se dieron cuenta q estaba medio abierto y pues me tocó a mí. Pero ordené un nuevo kit y todo perfecto. Funciona 100%.
S**.
Works perfectly
Easy to install and works perfectly. Everything needed for a complete replacement.
Trustpilot
1 day ago
1 month ago