🍳 Roll, Prep, Impress — Your Kitchen’s New Power Player!
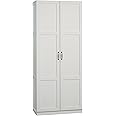
The HOMCOM Rolling Kitchen Island Cart combines a durable stainless steel countertop with versatile storage options including adjustable shelves, drawers, and built-in racks. Designed for easy mobility with four sturdy wheels and a compact footprint, it supports up to 132 lbs total weight, making it the ultimate space-saving, professional-grade prep station for modern kitchens.


| Item Weight | 55.9 Pounds |
| Size | 57" x 17.75" x 36.5" |
| Item Dimensions D x W x H | 17.75"D x 57"W x 36.5"H |
| Door Style | Raised Panel |
| Item Shape | Rectangular |
| Finish Types | white |
| Style Name | Country Rustic |
| Color | White |
| Handle Material | Stainless Steel |
| Frame Material Type | Wood |
| Back Material Type | Wood |
| Top Material Type | Stainless Steel |
| Material Type | Wood |
| Required Assembly | Yes |
| Mount Type | Freestanding |
| Base Type | Legs |
| Is Electric | No |
| Number of Doors | 2 |
| Number of Drawers | 2 |
| Number Of Shelves | 3 |
| Number of Pieces | 1 |
| Additional Features | Convenient organization, With wheels, Space saving |
| Mounting Type | Floor Mount |
| Weight Capacity Maximum | 132 Pounds |
A**Y
I am shocked!
I was very hesitant of buying a large piece off of Amazon. I was worried it would arrive damaged, or parts missing or the worse, awful instructions. I must say, I AM SHOCKED!! Not only am I shocked, I am very surprised on the quality! All of the pieces were very well packed and protected. Not 1 piece was damaged. It arrived in two boxes, the instructions are pictures. It did take us 2 days to put together, but only because we were not in a hurry. Once put together it is very nice, not as solid like I would have hoped, but it looks very nice, drawers are smooth and level, the shelves inside are solid. The doors are a challenge to get level, but it is a nice addition to our patio area. Very happy with this purchase!!
N**Y
Very Nice Rolling Island Cart!
I searched awhile before deciding on a kitchen island (on wheels), and am so glad I bought this one. It’s good quality for the money. I love that the wheels do not show, and that it is so easy to move it. I can push it easily any direction, which I like to do when I’m cleaning.The stainless steel top is good quality, but remember that fingerprints, etc… shows up on stainless, but you can easily fix that with a cotton rag and Stainless Steel Cleaner Spray.As far as putting it together, please take my advice on this. It is easier with 2 people (though not absolutely necessary). When you unbox the pieces (it comes in 2 large boxes), do yourself a favor and get little Dixie cups to put all the screws and what-nots in, and label each cup with a magic marker. In addition, get sticky notes so you can label all the boards and such. Doing this minor prepping of “labeling everything” saves a lot of time in the long run.There is an instruction booklet that is VISUAL. There are no written instructions, only pictures. The picture directions are easy to follow, and I encourage you to put this island together EXACTLY AS THE BOOKLET directs you to.This island is a nice piece of furniture that holds a lot for the size. There are 2 nice-sized drawers, but I wouldn’t put anything too heavy in them. The bottom of the drawers are made from very thin material, (so don’t risk damaging them with something heavy). I keep spatulas, measuring spoons, measuring cups, and whisks in mine, as I do a lot of baking and wanted all my tools to be closer to my work area near the sink. There are 2 cupboards that each have 2 levels, so there’s plenty of room for a lot of items. I keep bowls, baking racks, canisters, and other items inside the cupboards. In addition, there is a towel rack on one end of the island, and a shelf and a paper towel rack on the other end. These can be left off the island if you don’t want them.The only negative I have regarding this unit, is that there are spaces left where screws are counter-sunk, which to me look like holes. I plan on using white wood putty to cover those, but of course you wouldn’t have to do this if the holes don’t bother you.Bottom line, for the money, this is a very nice looking, very functional piece of furniture that will be a nice addition in your kitchen. I would definitely buy this again.
L**S
Very solid and stable; minor but fixable manufacturing flaws
I would love to give this product five stars, but I cannot, due to minor manufacturing flaws that (for some people) could be a serious problem. I will discuss these issues toward the end of this review. First, I want to describe the many things that are RIGHT about the product.Foremost, the finished product is a good looking, stable, well-designed enclosure that I find very suitable for my need for a storage area for barbecue equipment on my deck.The construction kit includes hardwood frame pieces, some hardwood plywood panels, side brackets and a shelf for the shelf assembly, and for the push handle, made from MDF (medium density fiberboard), four raised-panel style door fronts, parts for two drawers, and all required hardware (screws, pegs, hinges, brackets, handles, etc.).Assembly is not particularly difficult, but it is time-consuming. You will have to install about six dozen wood screws, 12 machine screws, half a dozen wood pegs, 8 hinges, 6 pulls, four wheels, and several sub-assemblies. Expect to take 3 to 5 hours unless you are exceptionally nimble and skilled.The entire assembly comes in two large boxes, each of which is fairly heavy. The parts were well-packed, with plastic foam surrounding them to prevent impact damage and thin plastic sheets between parts, as needed, to protect against damage to the paint finish during shipment. The stainless steel sheet covering the entire top piece comes with a protective film that should not be removed until assembly is complete.The basic “box” is made with standard plywood sheet carcase construction design, using hardwood members surrounding 1/4” plywood sheets. The hardwood pieces are all held together by wood screws that are inserted into pre-drilled holes. All the holes in my kit were properly placed, the right diameter, and the right depth, suggesting that they were created using precision jigs. All pieces were properly dimensioned, so that things fit together properly. The hardwood and plywood pieces were all painted a very, very dark green (near-black) so I cannot attest to the type of wood used, but none of the pieces showed any evidence of knots, cracks, warping or twisting.The finished product is solid and stable. The drawers slide in and out smoothly on wood runners. The doors on the lower cabinets fit well, and once hinges are adjusted properly, align well with each other and with the carcase. The painted finish is smooth and even. The wheels are large enough to allow rolling the cabinet over slightly uneven surfaces, such as one finds in an outdoor environment.Although this is offered as an “outdoor” furniture item, I would not leave it outdoors in rain or snow. The finish is likely to deteriorate under such conditions, leading to wood damage over time. Occasional exposure to light rain should not be a problem. If you must leave it exposed to weather, I recommend a plastic tarp or similar means to keep it dry.I found several production errors in the “kit”. Two were trivial, but another one could have been a show-stopper forcing a lengthy delay in assembly until a replacement part could be obtained from the seller. I suspect that might be a lengthy process, since the product is manufactured in China.The first error was that two parts had the wrong part number stickers applied to them. ”6” and “8” stickers were transposed. The second problem was that part #8, the crossbeam at the top rear of the carcase, did not have a hole drilled in it to accept a wood peg. That was easy to fix with a hand drill. That same piece also had a groove cut along two sides, when it should have had only one. However, that is harmless, since the flaw is hidden by the top piece (#1) in final assembly.The third error was potentially more serious, although I was able to resolve it easily since I own a table saw. There are two cross-pieces that go across the middle of the back panel (#10). Both are supposed to have slots cut top and bottom to accept the plywood panels. However, one of the #10 pieces had only one slot cut into it. See second photo. This manufacturing flaw was easy to resolve with a table saw (see picture 3), but would be difficult to fix without either a table saw,, router, or a hand held circular saw. See Photos 1 and 2 for the “before” and “after” of this simple woodworking surgery.The assembly manual is typical of products of this type that are sold internationally — it’s all drawings with no useful text. You should study these drawings carefully before beginning assembly, inventory all parts to ensure they are included, and also inspect all parts carefully to ensure that they are properly machined. If not, contact the seller. With respect to inventory counts, they have included one or two extra screws of each type, which is considerate. Also note that Part K, a hexagonal metric “Allen” wrench, is included in the plastic bag with the Part A screws, which are driven by the Part K wrench. Several of the illustrations are a bit confusing, but overall the instructions are adequate.I recommend the following assembly practices:spread newspaper or other protective material under the entire assembly area to keep from scratching paint off the cabinet parts;use a power screwdriver or electric drill with Phillips Head bit to drive all wood screws (except the A screws, which should be driven by hand with the supplied hex wrench);Follow the sequence of assembly exactly as outlined in the product assembly manual.You will need the following tools to complete the assembly:Phillips head screwdrivers size #1 and #2; or a power drill or power screwdriver with those bits;Metric hex driver (included as part K);rubber mallet (desirable but not essential to place panels snugly in position);sharp knife or box cutter to open cartons;- tape measure to verify sizes of all parts5/32” drill bit (optional if modifying position of storage rack on side of cabinet; see below.)While assembling the kit, I decided to eliminate the push handle that is supposed to be installed on the right side, and to move the storage rack from the left side to the right. This modification was necessary to fit the cabinet in the available space on my patio. I was able to install the shelf rack using the holes that were pre-drilled for the handle assembly. If one were to install the push handle on the left side, one must drill two additional holes to align with the lower holes on the handle brackets.I also modified the brackets on the sides of the shelf to make it functional as a paper storage rack. I removed the bottom rod from the rack assembly. Then I enlarged the hole on the front side bracket to 3/4” diameter, drilled all the way through, and the hole on the rear side bracket to 3/4”, drilled halfway through the bracket. I used a 15” long piece of 3/4” dowel to form the removable rod for a paper towel roll. One could also use a metal rod. (See right side of first photo.)A few notes on assembly that are not obvious from the printed assembly instructions:when assembling the back panel, the plywood sheets (part #12) stand about 3 mm (about 1/8”) above the frame members. This is the way the whole assembly comes together; the plywood fits into the notch in the bottom of part #8.install the hinges onto the carcase frame first, then attach the doors to the hinges. This is easier than the reverse sequence;the hinges are designed to allow adjustment of the door positions. Loosen the rear screws to move the door forward or backwards, and turn the front screws to move the doors left or right until they almost touch each other.If it weren’t for the manufacturing flaws, I would rate this as five stars. I still have given it four.
B**Z
Great addition to a small kitchen
Kitchen island is exactly what we were looking for. It arrived with some paint damage on two of the cabinet doors, I contacted the seller and got replacement doors within a week. Directions for putting it together are good, I took my time and a couple breaks, it took most of a day. Lots of parts which are marked, get the right ones in the correct orientation and follow the steps. You can do it. The stainless steel counter does get smudged but I found a Mr. Clean eraser sponge does a good job of cleaning.
C**H
Absolutely beautiful!!
It took about 3 hours to assemble. I didn’t think I would like the stainless steel top but it really accents the stainless steel appliances as well!! I love it!!!!!
T**S
Nice quality and and attractive.
One of the better quality items I have put together and it looks very nice. I would recommend it to anyone.
Trustpilot
2 days ago
3 weeks ago